If all goes according to plan, fiber optic installations will start in Loreto Bay in less than a month. For those who want more information on what this means, I’ve written four previous posts on the subject.
- Internet Options in Loreto Bay Today and Tomorrow
- Getting Strong Internet Service In Your Entire Loreto Bay Casa
- Automate Your Loreto Bay Casa With Smart Devices
- Bringing Streaming Services to Your Loreto Bay Television
So that I’m prepared for the speed of fiber optic, I converted my casa from Cat5 to Cat6 cables. Keeping track of network cabling isn’t a very exciting subject. It also seems to be misunderstood at times. I’ll explain some of the steps needed to upgrade from Cat5 to Cat6 cabling as well as why you might want to do it. There will be some Amazon links included that earn me a few pennies if you purchase using them.
My home was built in 2005-6 and conduit for network cabling was included in the walls. At that time, Cat5 cabling was used and it was definitely the best choice at that time. Now that 15 years have passed, there are better options and I’m in the processing of upgrading. This requires a number of steps to get the full benefit. I’m going to list some of the items that need to be addressed.
Before we dig too deep, what the heck is Cat5 and Cat6 anyways? Why does it matter? Rather than me trying to explain it all, I suggest you read Quick View: Cat5 vs Cat5e vs Cat6 Ethernet Cables. The very quick answer is that Cat5 supports speeds up to 100 Mbps. That was great 15 years ago. Now you can buy gigabit Internet in some locations which is ten times faster than Cat5 supports. So you could be paying for something your wiring can’t deliver.
Cat5e was an interim solution and it does support up to 1 Gbps. If that’s what you have now, you should be good in the short term. In theory, Cat6 supports up to 10 Gbps. My desire to upgrade from Cat5 to Cat6 is to prepare me for the next 15 years of data transfer.
The fiber plans that Telmex offers start with speeds as low as 20 Mbps and go up to 1 Gbps. For those going with the smaller plans, your current cabling will likely be just fine. But if you are planning on the bigger plans, you could be paying for speed that your casa can’t handle. My plan is to purchase the 150 Mbps plan as it is one peso less than I pay now for pitiful speeds. Even if you don’t want a “fast” plan today, this is an upgrade you should seriously consider so you’ll be prepared when you do want a faster plan.
Yes, WiFi dominates these days and good WiFi routers can support faster speeds. But they can only do their job with fast Internet if the wiring carrying Internet signals supports the faster speeds. The problem in my casa is that the fiber will be connected in my data panel and there was no way to get the full speed to the WiFi router inside my house. This meant I needed to upgrade my cabling.
Cabling and Patch Cables
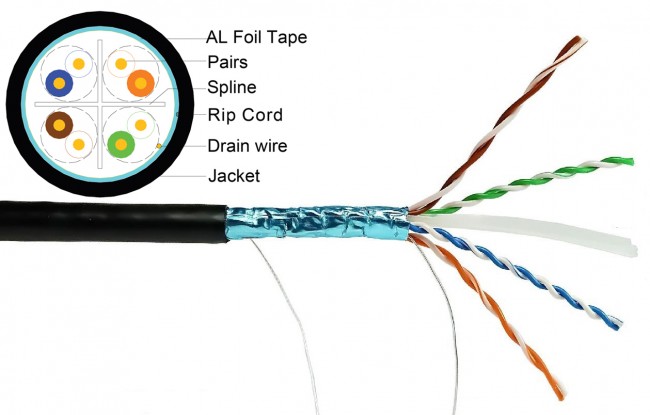
I can’t tell you exactly how much cable you’ll need as it depends on how many cable runs are involved and the length of those runs. In my case, I’m guessing that 200 feet of cable would be more than enough. Typically you buy cable in bulk and this Amazon Basics Cat6 Ethernet Solid Bulk Cable (23 AWG, UTP) – 1000-Foot will be enough for most projects with some to spare. You, or your installer may also needs a few other things to complete the job. A wire crimper and Cat6 cable ends are high on that list. The diagram below shows exactly what is in a Cat6 cable.
To connect the wall plates to switches and other devices, you’ll need some patch cables. In my mind, you can never have enough of them. The Amazon Basics RJ45 Cat-6 Ethernet Patch Internet Cable – 10 Feet (5-pack) is a good option to have on hand. Maybe you need some longer and some shorter and there are plenty of options available.
Wall Plates
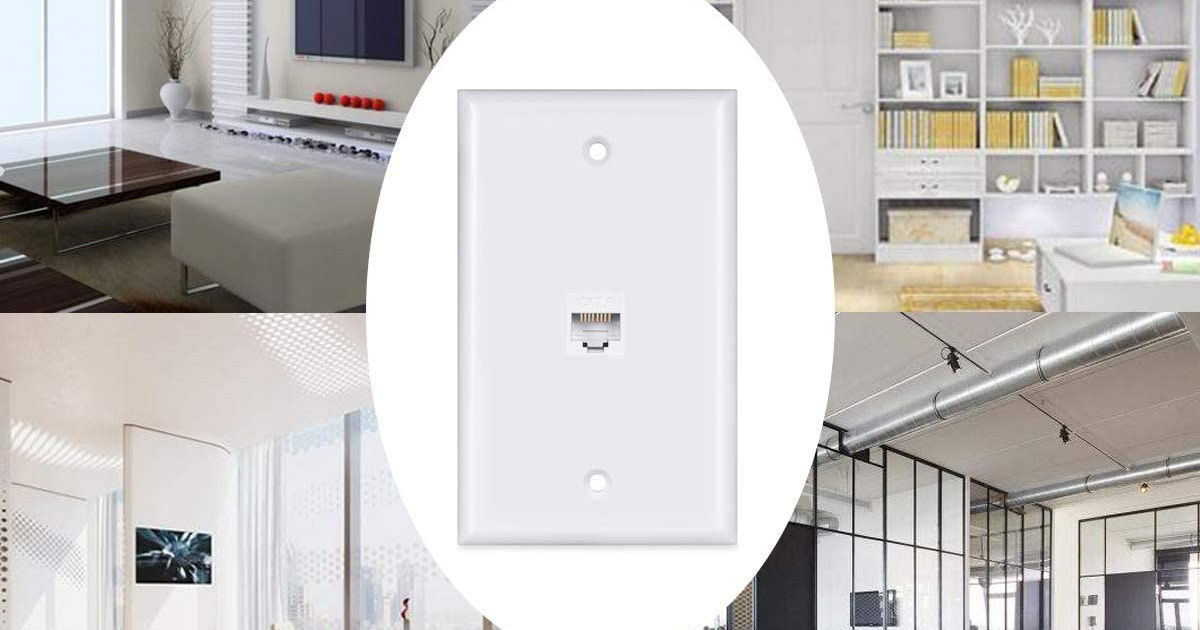
It may seem a bit odd, but even the smallest part can potentially slow down everything else. For that reason, you’ll want to make sure the wall plates support Cat6 or better. Here is a Cat6 Ethernet Cable Wall Plate that fits the bill.
Switches
If you plug in to the wall plate above, there is only one connection. If you need to support more wired devices, you’ll need a switch. Maybe you’ll only need a couple of ports, but it doesn’t hurt to have a few extra. For that reason, consider the NETGEAR 8-Port Gigabit Ethernet Unmanaged Switch. If you have multiple locations, you may need more than one switch.
Computers/Devices
Last, but not least, your devices need to support the higher speeds. This includes WiFi routers, computers and any other device connected to the network. Note that the router Telmex provided does not support speeds over 100 Mbps so make sure they provide a better router if you opt for one of the faster plans.
Getting It Done in Loreto Bay
Even if you are a fairly geeky person, you probably aren’t going to do the conversion yourself. Pulling the cables through the existing conduit can be challenging. The rest of the project isn’t too difficult, but easier to let someone else complete as well. As most of you know, it can sometimes be difficult to find the right contractor for the job in Loreto Bay. I asked around and one answer came up and that was who I used. My project wasn’t without problems and lots of them. So don’t consider this a ringing endorsement. I used Ruben Rodriguez and you can call him at +52 613 118 7338 or email him at Rubenr8@hotmail.com. I’ll share my experience below so you know things to check carefully.
The installers were first expected on a Monday morning. Only one person showed up and told me that he couldn’t do the job without some help and the help didn’t show up. So that day he just looked things over so he knew what needed to be done and said he’d be back the next morning. He was a no-show on Tuesday. Finally on Wednesday morning the two of them showed up.
They were able to pull out the old cable and replace it with new cable in the two downstairs locations. While they tried very hard to pull out the cable going upstairs, it wouldn’t move. In the process, the cable carrying phone service was broken and I now have no working phone wiring. Thankfully my (landline) phones are all wireless so I’m able to work around this.
Getting a working cable to the upstairs was extremely important so we discussed some alternative plans. The only viable plan was to have a new conduit installed to directly connect the downstairs to the upstairs. This meant another contractor to make a cut to the outside wall, install the conduit and then patch over the cut. Some of you may need more than one of these new conduits depending on where you want to have cabling run.
After having the conduit installed, the cabling guys returned. It took them six hours to get the cable run upstairs which seemed to be excessive. I also asked if they could run a cable just from the upstairs to the downstairs (not connected to the data panel) as this allowed me to connect my mesh routers with cable instead of wireless.
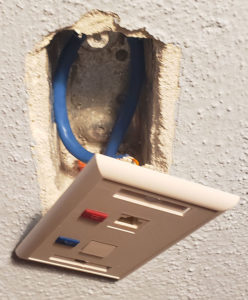 While the job was “done,” the results weren’t pretty. This wall plate wasn’t attached because “long screws are needed”. Never mind that it was attached before they started and there were no screws to be found after they left.
It got worse when I tested the connections later as none of the new ports on the wall worked. I asked that Ruben himself return to fix the work. He did come and found the wiring was not connected correctly. If you look at the cable diagram earlier, there are four twisted pairs of wire that are color coded. When each of the eight wires is connected, it must be connected in the right spot or things will fail. Once Ruben got all the wires in the right place, I had the fast connection I desired. Yes, he also got the wall plate back on the wall. It was just a very long and difficult process.
Getting all the pieces required in place may be a simple project and it may be quite complex depending on your situation. But if you want fast data transfer and Internet speeds, it is an upgrade you should start planning!


0 Comments